The HSL sliders (hue, saturation, & luminance) are the bulk of where our colour editing will take place.
As colour in photography is a huge deal in general, it’s worth understanding exactly what’s going on when we manage the colour in our images.
The HSL sliders give us precise control over our colour; however, each module serves a different function and purpose, so let’s dive into that.
Hue

Colour is thought of as a shade within a range in Lightroom.
Adjusting the slider left and right within a particular colour range changes the output colour of that entire range towards that shade.
The colour yellow, for example, can be pushed all the way left to turn into orange, or all the way right to turn into green. However it can’t be extended further than that.
This is a crucial point to make because if you, for example, decided to turn a yellow colour into green, you cannot then take the green slider and take that colour into aqua, then aqua into blue etc. - Lightroom doesn’t work like that.
Lightroom detects the colour of the pixels in the scene, assigns them a value within the range of colour that it sits in, and then it never leaves that range (unless you use Camera Calibration; a whole other topic).
In most cases, it’s more than enough anyway. Unless you’re seriously trying to warp reality in your images (and if you are, then you should be using Photoshop instead where you can go crazy and do whatever you like), the range of control granted here is good enough, especially for fast, smaller changes.
Saturation

A straightforward concept to understand.
It takes the value of that colour and intensifies it, or mutes it.
Sliding a given colour left will desaturate it, sliding to the right will increase its saturation.
This particular section provides a much more precise degree of control than the saturation slider in the Presence panel. The saturation there is a global adjustment, affecting every single pixel in the entire image; while the saturation here in the HSL sliders can be considered to be a targeted adjustment; only changing the desired colour individually.
Luminance
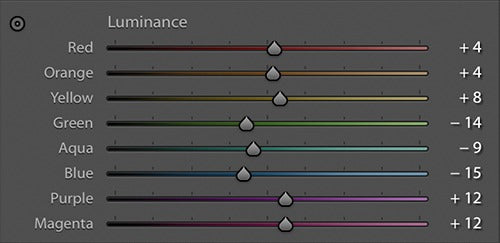
Luminance refers to the brightness or darkness of a given colour.
This can come in handy for a myriad of reasons: taming the brightness of the sun in a sunset image, bringing back some darkness and colour in a washed-out mid-day sky shot, controlling the reflective and specular highlights on the face of a portrait.
It can also be used for more creative purposes and aesthetic styles; dark greens can make a forest appear more “lush”, dark blues in a sky can produce a mood even in a high-sun shoot, brighter yellows can bring an ethereal feel when shooting directly into the sun.
Mastering the many creative applications that involve luminance can really make your images unique.
B&W

The HSL panel also turns into the B&W panel when the “Black & White” setting is checked at the top of the Basic panel in the “Treatment” section.
If you have chosen to shoot your image in RAW (which you should be doing), you’ll have the option for “Black & White Mix” available to you. If the image is JPEG, then, unfortunately, the colour information will be lost as a part of the image’s conversion process so you won’t have access to it (just shoot in RAW next time).
Black & White Mix is simply a simplified version of the luminance section in the HSL panel.
Because the image is a RAW image, Lightroom still remembers what colour values are assigned to each pixel, allowing you to change the luminance values of each colour, which provides incredible creative control when deciding how to shape your edit.
And as a bonus, when pushing the sliders to the max, images tend to fall apart (more on this in a moment) less using Black & White Mix than when dealing with colour.
Tips for using the HSL sliders
Here are some quick tips to get the most out of your HSL sliders when post-processing.
Quality degradation and colours falling apart

Depending on the quality of camera you have, sometimes when you push the sliders too far to one side, you’ll notice subtle breakdowns in your colours.
Without getting technical about bit depth, this is caused by the settings being just a little too much for the file to handle, so you may have to dial it down a little on that particular setting if you see this occurring.
Depending on the preview settings you have in Lightroom, this may show up all the time, so make sure you zoom into 1:1 and check at the pixel level to see whether this is occurring or not.
Skin tones
Watch out for skin tones when shooting images with people in them.
Aside from extreme over saturation, nothing screams amateur more than oompa loompa skin.
Once you get your hues right, luminance can really help to shape the different kinds of highlights on the face. Depth and dimension can get lost when globally adjusting highlights, so using luminance is a great way to bring them back.
The adjustment point tool

This tool is useful for locally selecting the individual parts of the image you want to change, and then simply dragging to change them.
It’s great because sometimes colours can be a little complicated and span over multiple ranges. This tool automatically determines the mix of those ranges and applies the appropriate distribution so that your edits look right. Neat!
tl;dr
Colour is essential in our images, and the HSL sliders are where the bulk of the editing action takes place.
HSL stands for hue, saturation, and luminance.
Hue refers to colours in a range, saturation refers to the intensity of colours, and luminance refers to the brightness of colours.
When the B&W mode is activated, the HSL sliders turn into Black & White Mix, a version of luminance control exclusively for black and white images.
Be attentive about images falling apart from being pushed too far, and try to shoot in RAW whenever you can so that you have the most amount of flexibility while editing.