The Tone Curve in Lightroom is one of my favourite tools to use when editing, but it’s tricky to master.
This article answers the question of how to use the Tone Curve properly but also explains what’s going on under the hood - something that most articles don’t cover.
To start, the Tone Curve in Lightroom is a fantastic way to adjust an image for contrast and tonal manipulation but is also a very powerful way to colour grade too.
It’s a very precise tool that you can easily get lost in, but taking the time to understand and experiment with it will take your post-processing to the next level, so it’s worth it.

What does the Tone Curve actually do?
The Basic Tone sliders and Tone Curve are closely related.
Many people think they’re interchangeable and do the same things, but they don’t.
The Basic Tone sliders adjust the actual image data itself - if you’re using a RAW image, you can see how drastic some of these changes can be. With the Basic Tone sliders, you’re adjusting the “baseline” (so to speak) of the image itself - the actual raw data of the image.
The Tone Curve manipulates the tones of that data - it works to alter and adjust the values that are already in the image itself.
You can see this in action yourself - make some changes in the Basic Tone sliders, and you’ll see the Histogram behind the Tone Curve shift and change. This is the “baseline” image data being changed.
Whereas moving points around the Tone Curve doesn’t change the underlying image data - the original Histogram doesn’t change, even if the overall image Histogram does.
Think of it this way:
The Basic Tone is for exposure correction - getting your image to the point with the most information as possible.
The Tone Curve is for tonal correction - manipulating the tones and information that already exist in the image.
A lot of people make the mistake of exposure correcting using the Tone Curve, and a lot of people miss out on the benefits of controlling contrast with the Tone Curve and just use the Basic Tone sliders.
While there’s no right or wrong way to do anything, but thinking about it in the way above will allow you to have the most flexibility and power at your disposal while editing.
Region-based vs Points

The Tone Curve comes in two main flavours: Region-based curves, and Point-based curves.
Each method has their pro’s and con’s to consider, but both methods work independently and additively from one another; you can adjust one, switch to the other and your changes don’t reset.
A practical example is that you could control tonal contrast with the Region-based Curve, then adjust colour correction with the individual channel RGB curves (more on these later). One wouldn’t cancel out the other.
Region-based Curve

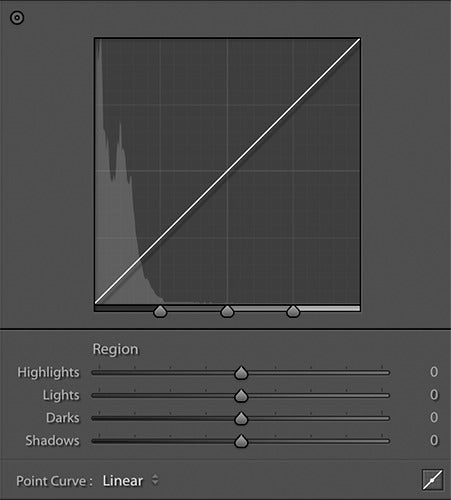
This is the standard Tone Curve that presents itself with the default settings of Adobe Lightroom.
It’s fantastic for super quick, easy-to-understand contrast control and comes with in-built presets for quick contrast switching, as well as the ability to save your own presets to speed up your workflow.
You can manipulate it in two ways:
1) Using the curve itself - Picking a spot on the line and adjusting the values up and down. Towards the far bottom left, you can manipulate the Darks of the image, and moving along to the upper right you can manipulate the Shadows, Lights, and then Highlights of the image.
2) Using the Region sliders - You have independent control of Highlights, Lights, Darks, & Shadows using the Region sliders. This is a super quick way to manipulate the curve, especially if you’re just looking for a quick contrast boost.
Point Tone Curve

The Point-based Tone Curve is where things start to get fun.
Along the X-axis, you again have Shadows, Darks, Lights, & Highlights moving from left to right, however this time you have full control over where each point goes, and how far up or down it can go.
This precision is so useful for your images, and once you master it, these settings can take your editing to the next level.
How to use the Point Tone Curve
Typically to add contrast, you want to drag down your Darks and raise your Lights, creating a sort of “S-looking” curve. Doing the inverse (raising Darks and bringing down Lights) will give the image a “flatter”, less contrasty look - the choice is yours.
RGB Channels

In the Point Tone Curve mode, there’s a setting called “Channels” that lets you directly manipulate the Red, Green, or Blue colours individually, or lets you generally manipulate the tones with the RGB setting.
This particular feature is super powerful.
It’s not only great for colour correction (especially on skin tones in Portraits), but it has a tonne of creative uses such as split toning, clipping colours, removing colours altogether, and creating images with a coloured wash that you just can’t achieve with any other setting.
One particularly popular use for the RGB Channels is split toning.
Although there’s already a dedicated function just for that, the RGB Channels allows you to create your own.
Simply create anchors around the desired tonal range, and put another anchor for where you want to increase or decrease that range.
For example, if you wanted to split tone an image such that the highlights could be red to help a sunset, yet blue in the shadows also, your red and blue channels could look like this:


Adjustment point picker
Regardless of whether you’re using the Region-based, or the Point Tone Curve, in the top left-hand corner of the box, there’s an adjustment point picker available to use.
Using this tool allows you to select anywhere you want in the image and directly manipulate the exact values over where you select.
This allows for super-fast manipulation of either setting and even works in the individual RGB channels too.
Consider using this if you’re looking for a quick way to manipulate the Tone Curve.
The tl;dr
The Tone Curve is a super precise and powerful tool that’s great for manipulating contrast. It’s different from the Basic Tone sliders and does not manipulate the “baseline” exposure of an image, rather, it only affects what’s existing in the image.
The Region-based Tone Curve is great for fast contrast adjustment, while the Point Tone Curve is great for fine control over every part of the curve.
Either way, using the Tone Curve well will improve your contrast editing abilities and take your images to the next level.


0 comments